C-Veggies: The Ultimate Super Veggies!

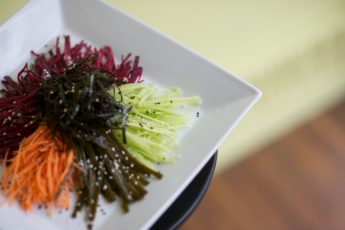
There is really is not such thing as C-Veggies – but Sea Veggies on the other hand are amazing. Often the word SEA in itself is enough to scare most people away. So I softened that up and used the letter C to represent these delicate superfood gems of the sea – but C also stands for cleansing, calcium and chlorophyll as this is what these guys are packed full of! This is just to give you a taste of what I will be getting into.

If you haven’t experimented with sea veggies yet, then you are truly missing out. They are so diverse in their use that the list just goes on and on. Most of you have actually had sea vegetables, many times. What do you think your sushi is wrapped up in? Nori! One of the most commonly used sea veggies. It is super delicious and versatile. You can crumble it on salads, drop it into soups or just snack on it plain! Then the realm of sea veggies carries over into dulse, arame, wakame, kelp, kombu, hijiki, agar, kuze – they all sound kind of funny (I love naming them off in my classes), they all have different uses, a distinct flavour – but what they all have in common is that they are loaded with minerals and chlorophyll! (CHECK OUT THIS GUIDE to get more familiar with each one!) There is even a new and fun variety of kelp – which comes in noodle form. Pretty fancy stuff – it has been stripped of it’s green essence, leaving it colourless and flavourless but it is a great base to a raw spaghetti or pasta dish! (see recipe below!)

All in all, Sea Veggies are an amazing condiment to add to any recipe -cooked or raw. A simple slaw salad, a stir fry, miso soup, on top of a veggie burger, in a wrap. I think you get the point. But what is relevant to know, is that you need so little to get the benefits. Just a little goes such a long way. In Macrobiotics - sea veggies are a staple to the diet but are only used as a condiment to every meal. They are balancing and make your meal look beautiful, interesting and unique. You will also be happy knowing that you are getting an extra dose of much needed nutrients.

Let me take you through the benefits of Sea Veggies – hopefully this will inspire you to at least try one variety!

Sea Veggies…

reduce blood cholesterol

remove metallic and radioactive elements from the body (great for chemo)

prevent goiter (enlarged thyroid condition)

have antibiotic properties

strengthen bones, teeth and nerve transmission

help digestion

softens hard masses in tumors

used as a beauty aid – helping to maintain glowing, healthy skin and lustrous hair

Lastly…ounce for ounce sea veggies provide all the vitamins and minerals that are required for human health (similar to what is found in human blood -including calcium, iodine, phosphorous, sodium, iron and vitamins A, B, C and E) and it is also an excellent source of  protein!

I will leave it at that!

SEA MY VEGGIES – Creamy Kelp “Alfredo” Noodles

Sauce:

2 heaping tbsp raw tahini

2 tbsp tamari

2 tbsp apple cider vinegar

2 tbsp lemon juice, freshly squeezed

1 tbsp hemp seeds

1/4 cup chopped parsley

1/4 cup chopped garlic leaves (from my garden) or 1 clove of garlic

sea salt to taste

blend up with a bit of water to thin out (not too much!) – approx 2 tbsp!

Veggies:

1 pack of kelp noodles – remove kelp from package rinse and let sit in warm water with lemon juice for 1 hour to soften!

— if you can’t find kelp noodles (found at local raw restaurants or online from Upaya Naturals), double the amount of zucchini to use as a noodle base!

1/4 cup arame, soaked for 15 minutes

1/2 cup kale, chopped

1 cup shredded beets and carrots

1 cup zucchini shredded

1 small bunch  broccoli (marinated with olive oil and sea salt and dehydrated or baked on a low temperature for 20-30 minutes until soft and tender – scrumptious!)

Pour the dressing over the noodles, add the veggies , toss and serve!

Krunchy Kale Krisps

I love knowing that I can make “chips” from one of natures healthiest vegetables in my own kitchen. Kale chips have become a new craze in the Raw Food and Health world over the last couple of years. They serve a very important and satisfying purpose. They fulfill that salty, crispy, crunch that most people often crave every once in a while. Since these “chips” are full of delicious and healthy whole food ingredients, it makes them just that much better!

It doesn’t really take much to put them together. You don’t necessarily need a dehydrator, which is what is commonly used in most “raw” food recipes. So if you don’t have one, the good news is that you can just use your home oven (on a low temperature of course!). But if you have already gone the length and purchased a wonderful Excalibur dehydrator, then you may as well make your kale chips in there - as a dehydrator will preserve all the nutrients and enzymes  and ensure they don’t get “overcooked”, especially if they are only done at 115 F. If the oven is your only option, then you will need to keep an extra eye on them so that they don’t burn or shrivel up and disappear on you. Kale is a very tender green leafy vegetable that carries with it so many amazing nutrients.

Kale truly is a superfood. Kale contains powerful minerals and vitamins that strengthen your bones, protect your eyes, cleanse your blood, prevent colon cancer and makes your skin glow (now who doesn’t want that!). This all because Kale is an exceptional source of chlorophyll, calcium, iron, magnesium, vitamin A and C.

So the next time you are perusing through the produce section, or at your local farmer’s market or in my backyard…then grab a bunch of kale and experiment with it at home. Making kale chips is one way and a great way. But also marinating it in a salad or steaming it with some olive oil are other delicious ways as well!

If kale  you want to get more familiar with kale in the kitchen, then you may want to check out my Green Goddess Cooking Class next Wednesday!

Zesty Kale Krisps

Ingredients:

1 bunch of kale, washed and torn
1/4 cup tahini
2-3 tablespoons tamari
2 tablespoons apple cider vinegar
1/4 cup water
1 clove garlic
1 juice of half a lemon
¼ teaspoon sea salt
2 tablespoons of nutritional yeast (can add more for a “cheesier” flavour!)

Procedure:

Place kale in a large mixing bowl. Combine the rest of the ingredients in a blender and blend until smooth to get a thick consistency. You may have to add more water. Pour over kale and mix thoroughly with your hands to coat the kale. You want this mixture to be really glued onto the kale.

In Dehydrator:
Place kale onto a Teflex sheet, and dehydrate for 4 hours @ 115 degrees. You’ll need to use two trays. Rotate kale occasionally to dry uniformly.

In Oven:

Place on parchment paper on a sheet tray, and bake on a low temperature for about 30 minutes. Keep and eye on them and turn them often to make sure they dry evenly.


You can use any variety of Kale for this recipe, however curly kale tends to taste and turn out the best!