Eat more Raw Now!

Almond basil pesto recipe below!

Grab a spot on my Raw Urban One Day Detox Retreat!

Or Join my Raw Essentials Workshop or Raw made Easy !

Adding more raw foods into to your diet is a great way to boost your health. This means making sure the bulk of what you eat focuses on fresh fruits, vegetables, nuts, seeds and sprouts. With these foods as the foundation of your diet you will have more energy, lose weight and feel great. Raw foods are loaded with enzymes, vitamin and nutrients.

I am not suggesting you become a 100 percent raw foodie or adhere to strict guidelines, but rather simply incorporate more fresh foods into your diet. Even if half your meals each day consist of raw food, you are on the right track.

Five easy ways to add more raw to your diet:

1. Have at least a serving or more of fresh fruit every day: This can include an apple, pear, orange, berries or a fresh fruit smoothie.

2. Have multiple servings of fresh vegetables every day: Cut up carrots, celery, peppers, make a large dark leafy green salad or a fresh pressed green juice.

3. Enjoy a handful (or two) of raw organic nuts and seeds. Put them into a trail mix with raisins, goji berries, apricots – and you can even add some pure raw dark chocolate (cacao) into the mix.

4. Grab a bag of fresh sunflower or pea sprouts from your local health food store or farmers market, these make a great addition to salads, sandwiches, soups, stirfrys and smoothies. Or order them directly from Giddy YoYo and have them delivered to your door!

5. Get creative and try to prepare a few new raw recipes each week (check out different books, websites or videos on how to prepare things like smoothies, raw nori rolls, cookies and nut based spreads).

For an informative and inspirational day on living well with raw concepts grab a spot for my Raw Urban One Day Detox Retreat!

Or for some more inspiring raw recipes & concepts then join my Raw Essentials Workshop or Raw made Easy Cooking Class!


Almond basil pesto

Try this recipe – this is a delicious spread to enjoy with raw bread, flatbread, and crackers or served with crunchy raw veggies, kelp noodles or shredded zucchini

Ingredients:

2 tbsp torn fresh basil
1 tbsp chopped parsley
1 cup whole almonds, soaked overnight or for eight hours
½ cup pine nuts
2 tbsp lemon juice
1 garlic clove
¼ cup olive oil (or more) for a creamier consistency

Instructions

1. Place all ingredients in food processor and blend until smooth
2. Place in a small bowl and refrigerate
3. Serve with cucumber slices, zucchini noodles, carrots, whole grain or raw crackers or brown rice pasta/kelp noodles or steamed vegetables

You can get more delicious knowledge by checking out Marni’s Cleansing with Superfoods e-book, available here: http://www.marniwasserman.com/ebooks/

The Moistest Most Delicious Banana Bread (I have ever made!)

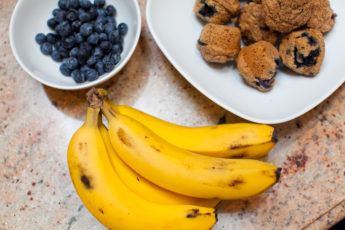
I love making banana bread or banana muffins, it has to be my favourite thing to bake. This is probably because I grew up on chocolate chip banana muffins that my mom used to make.

A batch of them were pretty much around every week while I was growing up and then a special birthday batch was always made for my birthday sleep-over parties. I remember taking her muffins and squishing them into my mouth, as they were so soft, moist and tender!

Once I got a handle on the ingredients that my mom was using, I took the recipe into my own hands and switched things up – for the better of course! However even though mine are fairly soft, I could never quite achieve the moistness that she did…

So every now and then I like to change up the recipe even more, to try new things and achieve a different texture and flavour. Since I am always finding new ways to use my left over almond pulp from making my own Nut Milk, this seemed like the perfect opportunity. The soft grainy almond bits are totally useful in recipes for muffins, pies, cookies whether raw or baked. I have made many raw cookies, using the pulp as filler and as a binder, but baking with it – is a totally different experience!

It will give your recipe a chewy, moist, rich texture that is loaded with fiber and trace amounts of heart healthy fat (as most of it is in the milk).

So of course I am leading up to the climax here, so what I used was 1 cup of almond pulp in my banana bread along with most of my other “tried, tested and true” ingredients and what came out was an incredibly moist, rich, dense banana loaf. If you are one that is into light and fluffy, this bread is not for you! I definitely achieved the moistness that my mom’s muffins had, but this loaf was hearty and decadent, my kind of loaf – as light and fluffy, does not do it for me! In fact when I normally ate my “regular” muffins, I would throw on a slap of nut butter to cream it up a bit, which is definitely not needed in this recipe. Enjoy!

Yup, that’s right there is a nice big smudge of warm chocolate on the plate!

Kamut-Almond Banana Bread

1 cup fresh almond pulp (the fresher the more moist your bread will be)

1 cup kamut flour

1 tsp baking soda

1 tsp baking powder

¼ tsp cinnamon

½ tsp sea salt

2-3 ripe bananas (depending on their size)

½ cup rice milk

¼ cup coconut oil, melted

¼ cup maple syrup

1/3 cup applesauce + 1 tbsp ground chia

1 cup blueberries or chocolate chips

How it’s made!

  1. Pre heat oven to 350 F.
  2. Mix wet ingredients and dry ingredients separately.
  3. Use a large bowl for the dry ingredients. Then mix wet ingredients into dry and fold slowly, and mix together until there are no lumps. Stir in blueberries or chocolate chips.
  4. Drop by spoonfuls into an oiled muffin tray or pour batter into a loaf pan.
  5. Bake for 20 minutes if these are muffins or 40-50 minutes if this is a loaf.

You can get more delicious knowledge by checking out Marni’s Veggin’ Comfortably e-book, available here: http://www.marniwasserman.com/ebooks/

Who doesn’t love Jam Dot Cookies?

A couple of weeks ago I took on the Canada am Cookie Challenge. I thought that for whatever it was worth, I would submit one of my favourite cookie recipes to see if it would win and Canada would realize just how delicious this cookie really is. My cookie wasn’t the winner, but made it as one of the finalists, ( I didn’t even want the prize: $500 to the Bay),  I wanted people to taste a cookie that was made without butter, sugar, flour and cornstarch. If you didn’t know it already – cookies can be made WITHOUT these ingredients – and still taste amazing.

I selected this recipe in particular because as a little girl, nothing made me happier than creamy, white Jam Cookies. When I decided to give those up as I transitioned into healthy eating, I still longed for something that tasted similar. I came across a recipe that used all of the above “traditional” ingredients and began by converting them over one by one and landed with this recipe!

Which to me, is not only super simple, but it is also super delicious. I have tested it out on many a family member and have had nothing but a great response. So I thought the team at Canada AM would think the same?

Maybe next year my Jam Dot Cookies – filled with coconut oil and maple syrup will get the recognition and glory that they deserve. These ingredients may be new some some people, but they are responsible for making every one of my baked goods turn out perfectly and taste incredible. Others eventually will learn this – and it will become public delicious knowledge. Until then, enjoy the recipe below!

Jam Dot Cookies

1 cup almonds, ground to fine meal

1 cup spelt flour

1 cup rolled oats, ground to a fine meal or oat flour

¼ teaspoon ground cinnamon

½ cup melted pure coconut oil

½ cup maple syrup

Pinch of sea salt

Strawberry or raspberry jam (fruit sweetened or no sugar added)

Procedure:

Preheat oven to 350, line 2 baking sheets with Parchment paper.

  1. In medium bowl, combine almonds, flour, oats and cinnamon. Mix well to combine.
  2. In separate bowl, blend oil, maple syrup, and sea salt. Add to nut mixture and stir to combine.
  3. Roll into walnut sized balls. Place on baking sheet and press down with thumb.
  4. Fill indentation with jam and bake for 15-20 minutes.

Review: Chocolate Kale Chips…say what?

Chocolate Kale Chips

Well they have done it – matched two unlikely combination’s to make the perfect tastiest snack. Chocolate Kale Chips, can you think of a better combination? These are two foods that I tell people to eat just about everyday but why not eat them together? Not only that, their nutritional profile proves to be loaded with magnesium, calcium, iron, chlorophyll and fiber – delicious!

Blue Mountain Organics has truly proven to be a mastermind at creating to most unique blends of raw, organic snacks, treats, flours and desserts. I have had the extreme pleasure of enjoying their RAW Cashew Ice Cream (sorry no nutters, you are truly missing out). It is absolutely to die for! Words can’t even describe how good this frozen non-dairy dessert is. They also have a wide variety of unique supplements like carob powder, sunflower lecithin (soy free) along with sprouted beans and whole grains.

And of course some raw nut butter spreads from cashew, tahini, almond, pecan… you name it! They are called Better than Roasted because  for a RAW nut butter they taste pretty fantastic! Their online store, packaging and marketing is very cute, friendly and inviting. If you aren’t teased into at least buying 5 items on their website, I would be shocked! (and please make sure that Chocolate Kale Chips are on that order!!)

What is also truly amazing about all of their products, (and obviously why I am such a supporter) is that they are all superfoods, gluten free, dairy free, vegan, raw, kosher and organic. I wish there was a Blue Mountain Store right here in Toronto! But for now I will have to just order online – and pick up what I can at various health food stores in Toronto.

Freshly Picked and Made with Love!

raspberry basketPart 1 -

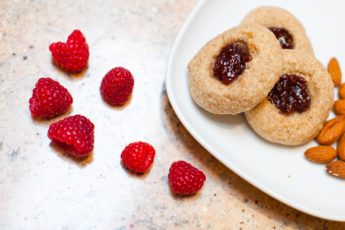
If you haven’t been raspberry picking yet this summer you should go before it is too late! These little red gems are so good when they are freshly picked. They are small, tart and juicy – and beaming with red hot love!

Last Saturday – my friend Jaime and I went to an Organic raspberry farm about a half hour north of Toronto (so worth the short drive). A cute cozy plot of land filled with lines of raspberry bushes.  At first we both opted for the largest basket, but didn’t realize how much work it actually is to pick raspberries. Also when they are this small, it takes that much longer to fill up a box. So by the end of the first line, we decided to combine our efforts and just have one basket between the two of use. This would bare more than enough fruit for our soon to be made – Raspberry Tart!

It was a hot one, so we didn’t last too long before we were anxious to get home and start baking. When raspberries are so super tart (in taste) like these ones, they are especially good when paired with something sweet. So the attempt was a fresh raspberry tart with a sweet almond crust. We stewed the raspberries with some Kuzu and Agar-Agar – (my two favourite sea-veggie based thickeners) to make the raspberries hold together in a jello-like consistency. I love using this stuff! Then instead of putting the raspberry blend on the tart crust, we put the raspberries in a bowl and crumbled the crust on top. Since baking likes to do it’s own thing sometimes, the crust didn’t turn out as planned. It was supposed to be on the bottom of our tart, but since it stuck to the glass (which isn’t supposed to happen – even though there was enough coconut oil on it)  – we scraped it out and used it as a crumble instead. Either way it was going down the same “pie-hole” – so to speak, and it all tasted the same – DELICIOUS. We weren’t trying to impress anyone but ourselves, so the actual look of it didn’t really matter. What mattered is that it tasted delicious and we have fun making it. So the moral of the story, is get out there, go pick some raspberries and put them in a smoothie, granola, a pie or raw pie, on cereal, fruit salad or just eat them straight from the bowl! Raspberries are not only beautiful and glorious to eat in the summer but they are full of antioxidants, fiber – and of course lots of love!

raspberry pie in making

Jaime – stewing up those Raspberries!

upside down pie

Our gorgeous up-side-down Pie!

J M raspberry

Two ladies in the bush – I promise, I am not naked!

Part 2-

I had so many leftover raspberries, I  made a Raw Berry Pie – as a second attempt. I have strawberries growing in my backyard, just bought some fresh blueberries, and picked some fresh mulberries from a friends tree (right here in Toronto!). So I was inspired not to cook these berries up- but instead – blend them up in my blender – with some fresh peaches for thickness – then I made an almond coconut raisin crust, poured my berry blend on top – and let it freeze. What a nice treat!

mulberries

These are the tastiest, sweetest berries!

It was a treat to have fresh Mulberries, as I have only ever had dried ones! They are also the most beautiful shade of purple!

raw pie

Here is my Raw Berry Pie!

So there you have it. Two ways to use up your berries this summer. Both Vegan, both gluten free and both delicious! Enjoy!

Fresh Berry Tart with Almond Crust (Cooked)

1 cup almonds

¾ cup brown rice flour

2 Tablespoons maple crystals

¼ teaspoon baking powder

Pinch of sea salt

3 tablespoons melted coconut oil

¼ cup maple syrup

Filling:

2 tablespoons agar flakes (to gel it together)*

1 ¾ cup apple juice

2 tablespoons kuzu dissolved in ¼ cup apple juice (to make it like pudding)*

2 tablespoons maple syrup

Sea salt

4 cups raspberries, rinsed and drained

Preheat oven to 350. Oil a 9” tart pan.

For the Crust:

  1. In food processor, grind nuts to a meal. In mixing bowl, combine nuts, flour, maple crystals, baking powder and salt.
  2. In separate small bowl, whisk together oil and maple syrup.
  3. Mix wet ingredients (oil and syrup) into dry ingredients (nut meal and flours).
  4. Press crust mixture into tart pan. Refrigerate 15-20 minutes, and then bake 20-25 minutes. Let cool completely.

For the filling

  1. In a small pot, simmer agar flakes in apple juice until agar completely dissolves. When agar dissolves, add kuzu/juice mixture. Whisk until mixture thickens. Add maple syrup.
  2. Add pinch of salt and berries. Cook 6-8 minutes. Remove from heat and let mixture cool partially. Pour into cooled crust pan.
  3. let set completely. Garnish with mint before serving. There may be a small amount of filling left, you can enjoy as a pudding by blending in food processor.

**Kuzu and Agar can be found at your local health food store in the Asian or macrobiotic section. There are tons of resources online to help you use them.

But two quick tips, dissolve and heat!

Raw Berry Tart with Almond Coconut Crust

For the crust:

2 cup almonds, soaked

1 cup coconut flakes

1/2 cup raisins

- blend in food processor until you have a uniform “dough”

- press out in a tart dish evenly all over and up the sides (there should be enough)

For the filling

2 cups fresh berries

1 tbsp lemon juice

2 fresh peaches

- blend in a high speed blender until thick and creamy

- pour the blended berries into the raw pie crust and decorate ad you would like

- place in freezer for several hours, serve and enjoy!

Milking it…for what it’s worth!

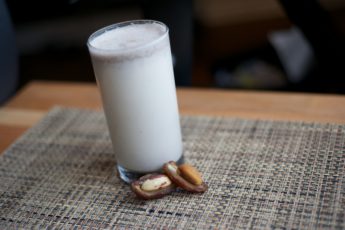
If you didn’t know this already, I am not an advocate for cow’s milk. I can write a whole blog post about this or I can simply just tell you that it is not conducive to human health. It does not build our immune systems, it suppresses it, it does not help with digestion, it hinders it – and most conventional types are loaded with pesticides, hormones and antibiotics. Do you want this in your body or in your child’s body? I think not. Have a look here on more on the Dangers of Cow’s Milk. I know this can be frightening for many, as the Dairy industry dictates so much of the information about dairy that we have grown to believe. More than you even know. We are brought up in schools that push the four food groups (with Dairy being in it’s own category), milk and chocolate milk are available everywhere, they have so much money that they pay off companies to promote to the public that it is healthy, bone building and ESSENTIAL for health. But those who have already made the transition, swear by the differences in their health – as far as allergies, immunity and over all well being – who can attest to this (please comment below)?

So that I don’t leave you hanging, I want to set you with the alternatives, the other possibilities that are out there to complete your smoothies, breakfasts cereals, granola, latte’s, baking ingredients and even ice cream etc… there are many such solutions.

First off you can go to the store and buy all kinds of milk substitutes. Of course soy is one of them – but I am going to steer clear from that one, again, there are alternatives. There is rice milk (Rice Dream, Ryza), Almond Milk (Almond Breeze), Hemp Milk (Living Harvest and Hemp Bliss) – even Oat Milk can be found in the markets. These are convenient and easy choices for most people. I am not completely opposed to them as people need to find things that are available to make this an easy and smooth transition.  Just be sure to look at the side panel for the amount of sugars or other additives. (FYI – added oils, and sugars are not necessary). You can buy unsweetened versions and just sweeten them yourself! Again, this is a safe easy bet for most people.

Now if you want to take it one step further, make your own milk. Sounds complicated, but really it isn’t. This works best mostly with either nuts or seeds – as making rice milk at home is not so simple! So once you have decided on your base – almonds, cashews, brazil nuts, sesame seeds, or hempseeds – all you need is water and other additions of your choice. You will also need a blender and some kind of contraption to strain your milk with. However with seeds, you can just blend and drink (you can with nuts too, it just depends whether you want a smooth creamy milk, similar to what you are used to!).

For straining you can use a fine mesh colander, cheesecloth or the funny looking device I have hear (which is actually a Jelly Strainer). But it works wonders for making nut milk. It is so easy to use and makes perfect milk every time. You actually get to “milk it” as if you were milking a cow, by squeezing down on the bag – you want to extract every last drop of liquid. It is rather fun! In fact I am going to give one away – depending on and how many times and how you respond to this post! The winner will be announced in one week! So if you want to know how to make the perfect “milk” then see the recipe below. Otherwise I encourage you to explore some of the other options that are out there, they are tasty, delicious and make the perfect substitution for milk.

For those of you who are wondering where you get your calcium and protein from without milk – let me assure you that even though the dairy industry would disagree, but you can get plenty of calcium from almonds, hemp seeds and sesame seeds! As for rice milk, you would look to other areas of your diet to boost these nutrients. Not everything has to come from a cow :)

P.S. FOR THE MILK TOLERANT PEOPLE – I want to just mention that Raw or Organic Cow’s Milk, Goat’s Milk and Sheep’s Milk are all suitable options!

Nut Milk Recipe

1 cup almonds, brazil nuts or hempseeds (soaked overnight)

4 cups of water

1 tbsp coconut oil (optional)

2 tbsp honey or maple syrup – you can even use 1-2 dates

1 tsp vanilla bean powder (or extract)

Simple and Delicious! Enjoy :)

My Favourite Vegetarian Meal!

This is a tough one for me, but I assure you – I do have a favourite vegetarian meal and so do you!

But first let me tell you about my favourite meal and then read on to find out why yours is important too.

Okay, so my favourite vegetarian meal is one that I like to create when I want something nourishing, warming and revitalizing. In which case I pretty much go for the foods that connect with this energy and make me feel amazing. My go to grain is usually quinoa, this is the best foundation for a wholesome dish. It is nutty, light, high in protein and digests immediately. Then I like to add in all of my favourites – starting with some baked marinated tempeh for it’s juicy and hearty texture, roasted sweet potatoes for some natural sweetness, steamed kalea meal isn’t a meal without some greens, avocado – for it’s creamy and smooth consistency and then some chopped almonds for some raw crunch. Then to top this dish off I like to add in some tamarinatural salty flavour and tahini for a rich boost of calcium. This is my absolute favourite meal!

Now why am I telling you this, because I want to make it apparent that everyone has a favourite food or a favourite meal, maybe it’s a snack or a drink. Whatever it may be there is something that you have eaten that has made you feel amazing – and I want to know what that is – especially if it is plant-based!

So if you tell me, this is going to work out for you because I am having a contest in which you will have a chance to win a FREE Fully Nourished Cooking Class!

Yes you heard me, you can attend any one of my cooking classes for free!

Well… there are some conditions that this contest is based on.

The premise: Tell me your favourite plant based/vegetarian meal, snack or drink. It can be raw, cooked, gluten free, sweet, savoury – anything you like! Just nothing that comes from an animal (this means NO fish, chicken, meat, eggs, cheese).

The reason: I want to know WHAT about this plant based or vegetarian food item that made you feel happy, excited, proud, energized, nourished, balanced etc…You don’t have to be vegetarian or vegan to do this or have had this experience!

There is significance and purpose to this contest. Not only will I highlight the winning answer on my blog, but the winner will also get to come to any on of my vegetarian Fully Nourished Cooking Classes absolutely free of charge (value over $100). This contest will also demonstrate to people that plant based foods not only taste amazing but have an incredible impact on your health and I want as many people as possible to exploit and share their experiences!

So there are many factors that this veggie experience can be based on. It can be the taste, texture, smell, colour, flavour of the meal – it doesn’t matter to me. I just want you describe what it was and what it did to you that made you excited about healthy plants based food. This can be anything from a simple salad with pumpkin seeds to a coconut banana smoothie. Please share your story, your experience – the more detail you give me, the better chance you have to win.

I am giving you (my readers) one week to post your foodie delight in my comment section – share it on twitter, share it on facebook. And then after that week, I am going to pick my three favourite ones and post them and then you (my readers) will be the judge and pick your favourite one. Then I will contact the winner personally and invite them to come to any vegetarian cooking class of choice to have more amazing experiences eating delicious plant based foods.

I have one more question…are you ready?

Get posting!

class calm

This could be you!

Yams or Sweet Potatoes ?

Yummy Yam Pecan Pie

There is so much confusion between yams and sweet potatoes. They look the same, they taste the same and you never really know which you are eating at any given time.
So I am going to do my best and give you some information on why these two roots are different from each other and not to be mistaken. However you can still choose to interchange them in recipes-I always do!

Yams were first cultivated in Africa and are part of the tuber family. They are very popular in tropical regions of the world. They are round and elongated with a thick, scaly or rough skin and it’s flesh can be either white, ivory, cream, pink or purple. Yams are typically mores starchy and dry. However the most common variety has a deep orange flesh, which is why they are often mistaken for sweet potatoes. Most of the time they are also mislabeled in stores and are actually sweet potatoes!

Sweet Potatoes on the other hand, are native to South America and is part of the morning glory family. Sweet potatoes are actually not at all related to Yams or Potatoes. They are very sweet and dark and sometimes mislabeled as Yams. Sweet potatoes have a wide center and taper at both ends. They also have a thin and smooth skin. Sweet potatoes are also sometimes mislabeled when actually they are yams.

I know it can be confusing…but when it comes to their nutritional content and health benefits they are pretty much the same with a few unique qualities between the two.
They are both amazing sources of beta carotene, an antioxidant found in most orange fleshed foods such as mangoes and carrots. They are both high in vitamin A and C with a good amount of thiamine. They are nourishing to the spleen, pancreas and stomach. Yams are particularly known for it’s properties to help regulate menses and prevent miscarriages. Yams also help to treat fatigue, inflammation, spasms and stress.

For more information on the differences between Yams and Sweet potatoes you can read many articles and resources available on the web with sometimes confusing, but insightful information these root veggies. Or you can always check out Rebecca Wood’s Whole Foods Encyclopedia for a small description on the health benefits and uses for each.

So in conclusion, both yams and sweet potatoes are amazing for their own unique properties. Now you can be just a bit more aware of which varieties you are eating (if it is labeled correctly). Either way both are sure to please your palate and make wonderful ingredients for side dishes, soups, dips, pancakes or pies!

Yummy Yam Pecan Pie

Crust:

1 cup almonds, ground
1 cup brown rice flour
2 tablespoon maple crystals
1/4 teaspoon baking powder
pinch of sea salt
3 tablespoons melted coconut oil
1/4 cup maple syrup

Filling:

2 cups mashed or cooked yams or sweet potatoes (you can always buy canned organic sweet potatoes or yams if necessary)
1 cup vanilla almond or rice milk
3/4 cup maple sugar, coconut sugar or sucanat
1/4 cup arrowroot powder
1 tablespoon blackstrap molasses
1 teaspoon ground cinnamon
1 teaspoon fair trade vanilla
1/2 teaspoon nutmeg
1/2 teaspoon sea salt
1/2 teaspoon ginger
1/4 teaspoon ground allspice
1/2 cup chopped pecans, mixed with 1 tablespoon maple syrup and 1 tablespoon coconut oil and roasted for 5-10 minutes at 200F

1. Preheat oven to 350 F. Oil a 9 in tart pan or a few mini tart pans.
For the Crust:
2. In food processor, grind nuts to meal. In mixing bowl, combine nuts, flour, maple crystals, baking powder and salt.
3. In separate small bowl, whish together oil and maple syrup
4. Mix wet ingredients (oil and syrup) into dry ingredients (nut meal and flours).
5. Press crust mixture into tart pan.
For the Filling:
1. Blend all the ingredients in a vita mix or a blender until well combined.
2. Pour the filling into the pie crust and bake for 45-60 minutes.
3. Cool on rack and then refrigerate over night before serving.